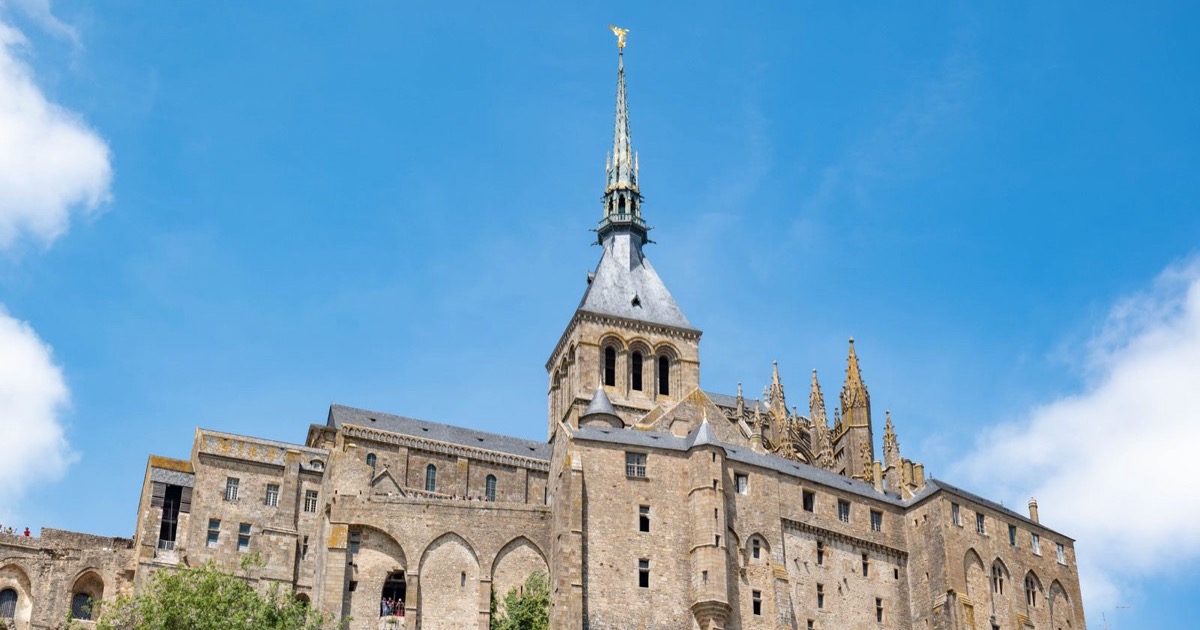

Welcome to the ultimate Mont Saint Michel photography guide, where every frame becomes a study in light, history, and tide‑driven drama.
Welcome to the ultimate Mont Saint Michel photography guide, where every frame becomes a study in light, history, and tide‑driven drama. This 2026 edition pulls together proven lighting tips, timing tricks, and composition ideas so you can capture the island’s iconic silhouette with confidence. Whether you’re planning a sunrise shoot or a long‑exposure twilight, the following sections break down the variables that turn a good picture into a standout image. Let’s dive into the specifics that seasoned travel photographers rely on when they set out for this Normandy landmark.
What is the best time of day to photograph Mont Saint Michel?
The golden hour—roughly the first hour after sunrise and the last hour before sunset—offers the most forgiving light for the Mont Saint Michel silhouette. During sunrise, the low sun casts a warm glow that highlights the abbey’s stone texture while keeping the surrounding sky rich in pastel tones. For those chasing Mont Saint Michel sunrise photography, arriving at the causeway at least 30 minutes before dawn ensures you catch the moment the tide recedes and the island emerges from mist.
Midday sun can be harsh, flattening details and creating strong shadows that obscure the intricate architecture. If you must shoot during these hours, consider using a polarizing filter to reduce glare and a neutral density filter for long exposure work, especially when the tide is high and water reflects bright sunlight. Overcast days, while softer, can still produce compelling images if you focus on composition and texture, leveraging the diffused light to bring out the stonework’s subtle patterns.
Evening light, particularly the blue hour that follows sunset, adds a cool contrast to the warm stone, making it ideal for travel photography composition that emphasizes mood. This period also aligns with the tide’s ebb, often revealing reflective pools that double the visual impact of the abbey’s silhouette.
How do the tides affect photography opportunities at Mont Saint Michel?
The island’s tidal rhythm creates distinct photographic scenarios that repeat on a roughly 12‑hour cycle. At low tide, the surrounding sandbars and mudflats expose a vast foreground, allowing you to frame the abbey against a wide, reflective surface. This setting is perfect for long exposure Mont Saint Michel shots that smooth the water and emphasize the stillness of the stone structure.
High tide submerges the causeway, turning the island into a true island and offering dramatic perspectives from the water’s edge. Photographers who time their visit with the Mont Saint Michel tide schedule photography can capture the abbey rising like a fortress from the sea, especially when clouds break and sunlight hits the upper towers.
| Tide Phase | Visual Advantage | Recommended Gear |
|---|---|---|
| Low Tide (≈ 2‑4 hrs after sunrise) | Expansive foreground, reflective pools | Wide‑angle lens, tripod, ND filter |
| Mid Tide (≈ 1‑2 hrs before sunset) | Balanced water level, soft shadows | Standard zoom, circular polarizer |
| High Tide (≈ 30 min after sunset) | Island isolation, dramatic silhouettes | Telephoto lens, fast aperture, handheld steady‑cam |
Planning around the tidal calendar also helps you avoid crowds, giving you cleaner compositions at the best photo spots Mont Saint Michel. Checking local tide tables a day in advance lets you schedule multiple shoots—one at sunrise, another at high tide—to capture the full range of lighting and water conditions.
Which angles showcase the iconic silhouette of Mont Saint Michel?
The classic view from the south‑west ramparts, looking across the causeway toward the abbey, frames the structure against the sky and highlights its tiered silhouette. Positioning yourself near the Grand Jébus gate during sunrise aligns the sun behind the abbey, creating a rim of light that outlines each level of the tower.
For a more dynamic perspective, consider the east‑facing angle from the small harbor where the water reflects the abbey’s outline. This spot works especially well for long exposure shots that capture the movement of water while the stone remains sharp. Drone photography Mont Saint Michel, where permitted, can reveal a bird’s‑eye view that emphasizes the island’s concentric layout and the surrounding tidal channels.
Another effective composition leverages leading lines: the cobblestone streets that spiral up to the abbey draw the viewer’s eye toward the top. Pair this with a shallow depth of field to isolate architectural details, or use a deep focus to keep both the foreground and the silhouette in crisp detail. Adjusting your angle based on weather conditions—such as using a cloudy sky to soften harsh light—will further enhance the final image.
What camera settings produce sharp images of Mont Saint Michel’s architecture?
To lock the intricate stonework of the abbey in crisp detail, start with a moderate aperture such as f/8‑f/11. This range delivers sufficient depth of field to keep the façade, the spires, and the surrounding walls in focus while preserving edge‑to‑edge sharpness. Pair the aperture with a low ISO (100‑200) whenever daylight permits; the sensor’s native performance will minimize grain and retain the subtle tonal shifts of the limestone.
Because the site is often visited by crowds, a shutter speed of at least 1/125 s is advisable when hand‑holding the camera. If you can secure a sturdy tripod, drop the speed to 1/30 s or slower to capture the ambient light without compromising sharpness. Switch the autofocus mode to single‑point or zone focusing, aiming the active point at a prominent architectural element (for example, the central doorway). This ensures the camera locks onto the most critical plane before you recompose for a wider view.
| Scenario | Aperture | ISO | Shutter Speed | Focus Mode |
|---|---|---|---|---|
| Bright midday | f/9‑f/11 | 100‑200 | 1/200 s | Single‑point on spire |
| Golden hour façade | f/8 | 200‑400 | 1/60 s (tripod) | Zone covering abbey |
| Evening interior | f/5.6‑f/7.1 | 800‑1600 | 1/30 s (tripod) | Manual focus lock |
How can I capture the reflection of Mont Saint Michel in the surrounding water?
The tide schedule dictates when a mirror‑like surface appears. Aim for a low tide that leaves a thin veil of water around the island; the calm expanse creates a natural canvas for reflections. Arrive early, set up a tripod, and use a circular polarizer to suppress glare while deepening the color of the sky and the stone.
Compose the shot low to the ground, aligning the horizon just above the water line. A slight tilt of the camera—about 2‑3 degrees—helps keep the reflected abbey sharp across the frame. If the light is soft, experiment with exposure bracketing (e.g., -1 EV, 0 EV, +1 EV) and blend the images later to retain detail in both the sky and the water.
- Check the tide chart the night before; aim for a window when the water is still.
- Use a remote shutter release or the camera’s timer to avoid camera shake.
- Set the focus manually on the abbey’s highest point; the reflected portion will inherit the same focus plane.
- Keep the lens hood on to reduce stray light that can cause flare on the water surface.
- If clouds are present, wait for a brief clearing; a single cloud can add drama without destroying the mirror effect.
- Consider a short exposure (1/250 s) during windy conditions to freeze ripples that add texture.
- After shooting, review the histogram to ensure the shadows (water) retain detail and are not clipped.
Which lenses are ideal for wide‑angle and detail shots at Mont Saint Michel?
For sweeping vistas that capture the island against the sky, a wide‑angle lens in the 14‑24 mm range (full‑frame) works best. Such a focal length allows you to include the surrounding sandbanks and the distant horizon while still framing the abbey’s silhouette. Prime lenses at these focal lengths often deliver superior edge performance and minimal distortion, which is useful when you need straight architectural lines.
When you want to isolate decorative carvings, arches, or the intricate roof tiles, a short‑telephoto lens (70‑200 mm) or a 50‑85 mm prime provides the necessary reach without crowding the scene. These lenses compress the background slightly, helping the subject stand out from the sky or the water. If you carry a tilt‑shift lens, you can correct perspective distortion on the vertical stone walls, keeping the lines parallel even when shooting from ground level.
How do I avoid crowds and get clean shots of Mont Saint Michel?
Timing is the most reliable tool for sidestepping the throngs that gather around the abbey. The first tide of the day arrives before sunrise; arriving at the parking lot at 04:30 CET gives you a clear promenade to the causeway while the sandbars are still exposed. Early light also reduces the number of tour buses that typically dominate the foreground after 08:00. If you prefer an afternoon session, aim for the low tide that occurs roughly two hours after sunset. The receding water pulls back the pedestrian bridge, leaving a narrow strip that only a handful of visitors manage to cross before darkness sets in.
Strategic positioning of your shooting spot can further diminish unwanted bodies. The western flank of the ramp, behind the old customs house, offers a low‑angle view of the spire with the bay as a natural frame. From this angle, the bulk of the crowd is blocked by the stone walls, and you can compose a clean silhouette. For long‑exposure work, bring a tripod and a neutral‑density filter; the calm water during low tide will render silky reflections that highlight the structure without the distraction of moving people.
Consider a secondary access point: the small footbridge that leads to the “Grand‑Roche” viewpoint. It is less advertised on mainstream maps, so it receives far fewer visitors. From there you can capture the full island with the surrounding mudflats stretching into the horizon, an ideal composition for a minimalist travel photograph. A lightweight travel‑size drone, operated well outside the regulated exclusion zone, can also provide aerial perspectives that avoid ground‑level congestion entirely.
What are the top hidden photo spots around Mont Saint Michel?
Beyond the iconic silhouette, the surrounding landscape hides several locations that reward a bit of extra walking. The salt‑marsh path that skirts the western edge of the bay leads to a low‑lying wooden platform built for bird‑watchers. This spot frames the abbey against a shallow pool of water, creating a mirror effect that is especially striking when the tide is mid‑range. The platform’s wooden railings also serve as leading lines, guiding the eye toward the towering spire.
Another overlooked angle lies behind the old monastery’s kitchen garden, accessible via a narrow gate on the southern side. Here, a row of ancient stone arches opens onto a small clearing that looks directly toward the main entrance. The arches act as a natural vignette, and the garden’s late‑summer foliage adds subtle color contrast to the stone. Early autumn, when the leaves turn amber, this spot yields a warm‑toned composition that differs from the typical cool‑gray tones of the island.
- Le Porte‑du‑Vent: a wind‑swept dune on the north‑east fringe that catches the sunrise behind the abbey.
- La Mare aux Mouettes: a quiet lagoon near the ferry dock where reflected clouds double the sky’s drama.
- Roche de Béthanie: a rocky outcrop reachable by a steep trail, offering a low‑angle view of the western façade.
- Jardin de l’Abbaye: the cloister garden’s western wall, perfect for framing the abbey with seasonal blossoms.
- Le Pont des Marées: the old stone bridge that appears only at extreme low tide, providing a dramatic foreground.
- Sentier des Moines: a hidden footpath behind the convent, delivering a side‑profile of the spire against the sky.
How can I use the golden hour to enhance colors at Mont Saint Michel?
The golden hour, occurring roughly one hour after sunrise and one hour before sunset, bathes the island in a warm, diffused light that brings out subtle hues in the limestone. Position yourself on the east side of the causeway for the morning glow; the low sun will illuminate the abbey’s front façade, turning the stone from a muted gray to a soft amber. During the evening, shift to the western shoreline where the sun sets behind the island, casting a rim of golden light around the silhouette. This backlighting emphasizes the intricate rooflines and creates a natural halo that adds depth to the composition.
To capture the full color range, use a camera set to a moderate ISO (400–800) and a wide‑aperture lens (f/2.8–f/4) to isolate the warm light from the cooler sky. If you prefer a broader scene, stop down to f/8–f/11 and employ a graduated neutral‑density filter to balance the bright sky with the darker stone. A tripod remains essential for the slower shutter speeds required in low‑light conditions; a remote shutter release or timer prevents camera shake.
Long‑exposure techniques can turn the surrounding water into a smooth, reflective surface that mirrors the golden sky, amplifying the color impact. When the tide is low, set the exposure to 10–15 seconds with a sturdy tripod and a small aperture. The resulting image will showcase the abbey’s warm glow against a glass‑like foreground, delivering a striking visual that stands out in any travel photography portfolio.
What gear should I bring for low‑light interior photography of Mont Saint Michel?
Choose a camera body known for clean high‑ISO performance; a full‑frame sensor or a modern APS‑C model will give you flexibility when the abbey’s candle‑lit chapels demand higher sensitivities. Pair it with a fast prime lens—f/1.8 or wider—so you can capture ambient light without relying on flash, which is prohibited inside most historic rooms.
A sturdy yet lightweight tripod is essential for long exposures, especially when you want to render the stone arches with crisp detail. Bring a remote shutter release or use the camera’s built‑in timer to eliminate camera shake. Spare batteries and high‑capacity memory cards keep you shooting through the extended visits without hunting for outlets.
Don’t forget protective accessories: a microfiber cloth and a soft brush to clear salt‑laden dust from the lens, and a weather‑sealed bag that shields your gear from the sea breeze that can sneak in through the narrow doorways. A compact LED panel with adjustable color temperature can help balance interior lighting when the natural glow is insufficient, provided it is permitted by the site’s guidelines.
How can I safely use a drone to capture aerial views of Mont Saint Michel?
First, verify the latest French civil aviation rules and the specific restrictions for Mont Saint‑Michel. The area is classified as a controlled airspace, so you must stay below the 120‑meter ceiling and keep the aircraft within visual line of sight at all times. Register your drone if it exceeds the weight threshold and carry proof of registration when you arrive.
Obtain any required local permits before you lift off. The regional authority often issues a short‑term authorization for photographers, which can be requested online or at the visitor centre. Schedule flights during off‑peak hours—early morning or late afternoon—to avoid crowds and reduce the risk of accidental interference with pedestrians.
Maintain a safe distance from the shoreline and the abbey’s stone walls; strong gusts can cause sudden drift, and the tidal currents generate unpredictable turbulence. Use the drone’s return‑to‑home feature and set a geofence around the protected zone. A spare propeller set and a portable battery charger will keep you prepared for multiple takes.
Sources & Further Reading
Frequently Asked Questions
When is the tide low enough to walk around the base of Mont Saint Michel for photos?
The lowest tides typically occur a few days before and after the full and new moons. During these windows, the surrounding sandbanks are exposed for several hours, allowing you to capture the silhouette of the island against the sky. Check a local tide table a week in advance, and arrive early to secure a good spot before the crowds gather.
Is photography allowed inside the abbey at Mont Saint Michel?
Yes, non‑flash photography is permitted in most interior spaces, but some chapels restrict any cameras to preserve delicate artworks. Look for signage at each entrance; if you see a “No photography” sign, respect it. When allowed, keep your equipment discreet and avoid using tripods that could obstruct other visitors.
Can I use a tripod at Mont Saint Michel during sunrise?
Tripods are allowed on the island, but they must not block pathways or impede the flow of tourists. Arrive before dawn to set up on a stable surface away from the main promenade. If the ground is wet from the tide, use a small sandbag or a weighted base to prevent slipping.
What are the parking options for photographers near Mont Saint Michel?
Official parking lots are located on the mainland, a short shuttle ride away from the island. Choose the lot designated for “photography and media” if available, as it often provides closer access to the shuttle stop. Arrive early in the morning to secure a space, especially during peak season.
Are there any photography tours or workshops available at Mont Saint Michel?
Several local operators offer guided photo walks that focus on optimal shooting times, composition tips, and post‑processing advice. These tours usually include a brief history lesson and allow participants to explore less‑crowded angles. Booking in advance guarantees a spot, and many groups provide equipment rentals for those traveling light.
How do I protect my equipment from the sea spray and wind at Mont Saint Michel?
Use a rain cover or a waterproof camera bag whenever you move between the island and the mainland. A lens hood helps deflect spray that can settle on the front element. After each session, wipe down the body and lens with a dry microfiber cloth to remove salt residue that could corrode metal parts.
What is the best way to capture night shots of Mont Saint Michel?
Plan to stay after the last scheduled light show, when the abbey is illuminated against a dark sky. Use a sturdy tripod, a wide‑angle lens, and a low ISO (400–800) to keep noise down. Long exposures of 15–30 seconds will reveal the reflected lights on the water, while a small aperture (f/8–f/11) ensures the entire structure stays sharp.
Do I need a permit to fly a drone over Mont Saint Michel?
Yes, a specific authorization is required because the site lies within a protected zone. Applications can be submitted through the French civil aviation portal, and approval is usually granted for a limited time frame and altitude. Carry the permit document with you while operating the drone, as inspectors may request proof.
Which season provides the most dramatic lighting for Mont Saint Michel photos?
Autumn offers a mix of soft golden light and frequent mist, which adds texture to the stone walls. Winter’s low sun angle creates long shadows and a stark contrast between the illuminated abbey and the gray sky. Both seasons have fewer tourists, giving you more freedom to compose shots without obstruction.
How can I edit my Mont Saint Michel images to bring out the historic details?
Start with basic exposure correction to balance highlights and shadows, then apply a subtle clarity boost to enhance stone texture. Use selective desaturation to mute the sky while keeping the abbey’s colors vivid. Finally, add a modest vignette to draw the viewer’s eye toward the central tower without over‑processing.
By planning your gear, respecting local rules, and timing your visits to match the tide and light, you’ll leave Mont Saint‑Michel with a collection of images that capture its timeless character. Keep an eye on weather updates and permit requirements, and you’ll be ready for every photographic opportunity the island presents.
Reviewed by our editor for Europe
Marco BianchiEurope Editor
Europe travel writer focused on city culture, museums and historic routes across the continent.
More articles by Marco Bianchi →